
Complete Guide · Navel Piercing
Belly Button Piercing:
The Complete Guide
Everything about navel (belly button) piercing — anatomy, pain level, 6–12 month healing, aftercare routine, best jewelry, rejection signs, pregnancy advice, outie vs innie, clothing tips, and 2025 styles.
Standard gauge — thicker than most ear piercings
Pain rating — less than most cartilage piercings
Average full healing time for a navel piercing
Upper navel rim only — standard placement
Best pregnancy jewelry — flexible biocompatible plastic
The navel piercing has been one of the most popular body piercings since the 1990s — and it remains a top-five most requested piercing globally. But it is also one of the most misunderstood: a high-movement surface piercing with one of the longest healing times and the highest rejection rates. This guide covers everything you need to know before, during, and after.
What Is a Navel Piercing?
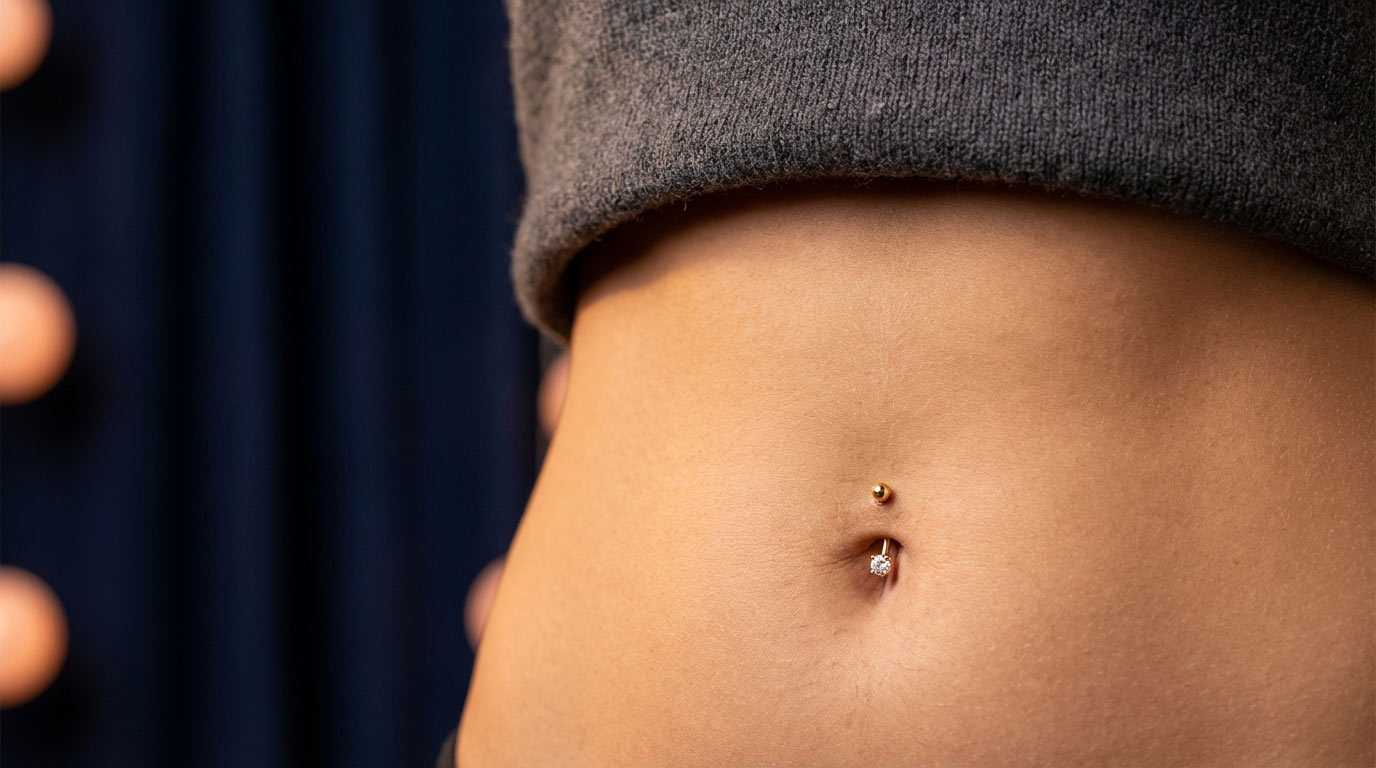
A navel piercing (also called a belly button piercing) is a surface piercing that passes through the skin at the upper rim of the navel. Unlike cartilage piercings that go through firm tissue, a navel piercing passes through a pinch of soft skin — making it technically a surface piercing with all the associated healing challenges.
The standard placement is at the top rim of the navel — through the small skin fold that sits above the belly button opening. Less common placements include the bottom rim and horizontal navel piercings. The jewelry sits in the curve of the navel, with one decorative ball visible above the navel and one below.
Because it is a surface piercing on a high-movement area of the body — constantly bent, compressed by waistbands, exposed to sweat, and disturbed by clothing — the navel requires more careful aftercare over a longer healing period than most piercings.
Surface piercing basics: Surface piercings pass through a pinch of skin rather than through a defined anatomical structure. This means they have higher rejection rates, longer healing times, and more sensitivity to irritants like clothing friction. Understanding this upfront helps you manage your expectations and take aftercare seriously from day one.
Innie vs Outie — Anatomy & Candidacy
Your navel anatomy determines whether you can get a standard navel piercing, a modified placement, or whether piercing is suitable at all:
Innie Navel
- Standard placement at upper rim works well
- Sufficient skin fold for a stable surface piercing
- Natural navel shape protects jewelry during healing
- Full range of jewelry styles available once healed
- Piercer will assess depth of fold — deeper = more stable
Outie Navel
- True deep outies cannot be pierced in standard placement
- No flat skin fold available for a stable surface piercing
- Floating navel or lower rim placement sometimes possible
- Higher rejection and migration risk regardless of placement
- Always consult an experienced piercer before booking
Floater navel piercings for outies: A floating navel piercing uses a curved barbell with one ball visible at the surface, positioned wherever the anatomy allows, rather than in the standard upper-rim position. This can work beautifully on some outie anatomies but requires a piercer experienced in surface piercing assessment. Never let a piercer rush you into a placement that does not suit your anatomy — rejection is permanent.
How Much Does a Belly Button Piercing Hurt?
The navel piercing rates 4–5/10 for pain. It is a pinch through soft skin — less painful than cartilage but more than the earlobe because the skin at the navel rim is thicker. Here is how it compares:
What to expect: A sharp pinch as the needle passes through the upper rim skin (under 1 second), then a mild throbbing warmth for 1–2 hours. The insertion of the curved barbell after the needle is often described as the more uncomfortable moment. Soreness when pressed or rubbed by clothing is normal for the first 1–2 weeks. Most people are surprised how quickly it is over.
Navel Piercing Healing Times
The navel is one of the longest-healing piercings at 6–12 months surface healing and up to 18 months for full internal healing. This extended timeline exists because:
The navel is in constant motion (every bend, twist, and step), constantly covered by clothing that creates friction, and regularly exposed to sweat. These factors slow the healing fistula formation significantly compared to piercings in less-disturbed locations.
| Milestone | Timeline | Action |
|---|---|---|
| Initial soreness resolves | Week 1–3 | Saline twice daily — loose high-waisted or low-rise clothing |
| Crusties reduce | Month 1–2 | Continue aftercare — avoid waistbands on the piercing |
| Looks and feels healed | Month 3–6 | Keep cleaning — still healing internally, do not change jewelry |
| Piercer confirms surface healing | Month 6–9 | First jewelry change in-studio if piercer confirms |
| Full internal healing | 9–18 months | All jewelry styles now safe — dangle rings and golds welcome |
The biggest navel healing mistake: Changing jewelry at 3–4 months because it "looks healed." The navel surface heals before the internal fistula channel is complete. Changing jewelry too early is the leading cause of navel rejection, irritation bumps, and prolonged healing. Wait until your piercer confirms full healing — then change.
The Piercing Procedure — Step by Step
Knowing what to expect makes the experience significantly less daunting. A belly button piercing at a professional studio takes under 10 minutes total:
1 — Anatomy Assessment
Your piercer examines the depth and shape of your navel rim, marks the placement, and confirms the jewelry size suited to your anatomy. This is the most important step — speak up if the mark does not look right to you.
2 — Area Cleaned & Sterilized
The navel area is cleaned with iodine or medical-grade antiseptic. The jewelry and needle are opened from sterile packaging in front of you. Ask to see this — any reputable piercer will be happy to show you.
3 — Piercing with Hollow Needle
A single-use hollow 14g needle passes through the upper navel rim skin. This takes under one second. The curved barbell is then guided through the channel immediately after the needle. Some piercers use a clamp, others freehand — both are valid techniques.
4 — Jewelry Secured
The decorative ball is threaded onto the curved barbell and tightened. Your piercer gives the area a final saline clean, checks alignment, and explains your aftercare routine. The whole procedure is typically under 5 minutes.
Never use a piercing gun on a navel piercing. Guns use blunt force through soft skin which causes excessive trauma and significantly increases the risk of rejection, infection, and scarring at the navel. The APP prohibits gun piercing for all surface piercings. Always choose a professional needle-only studio.
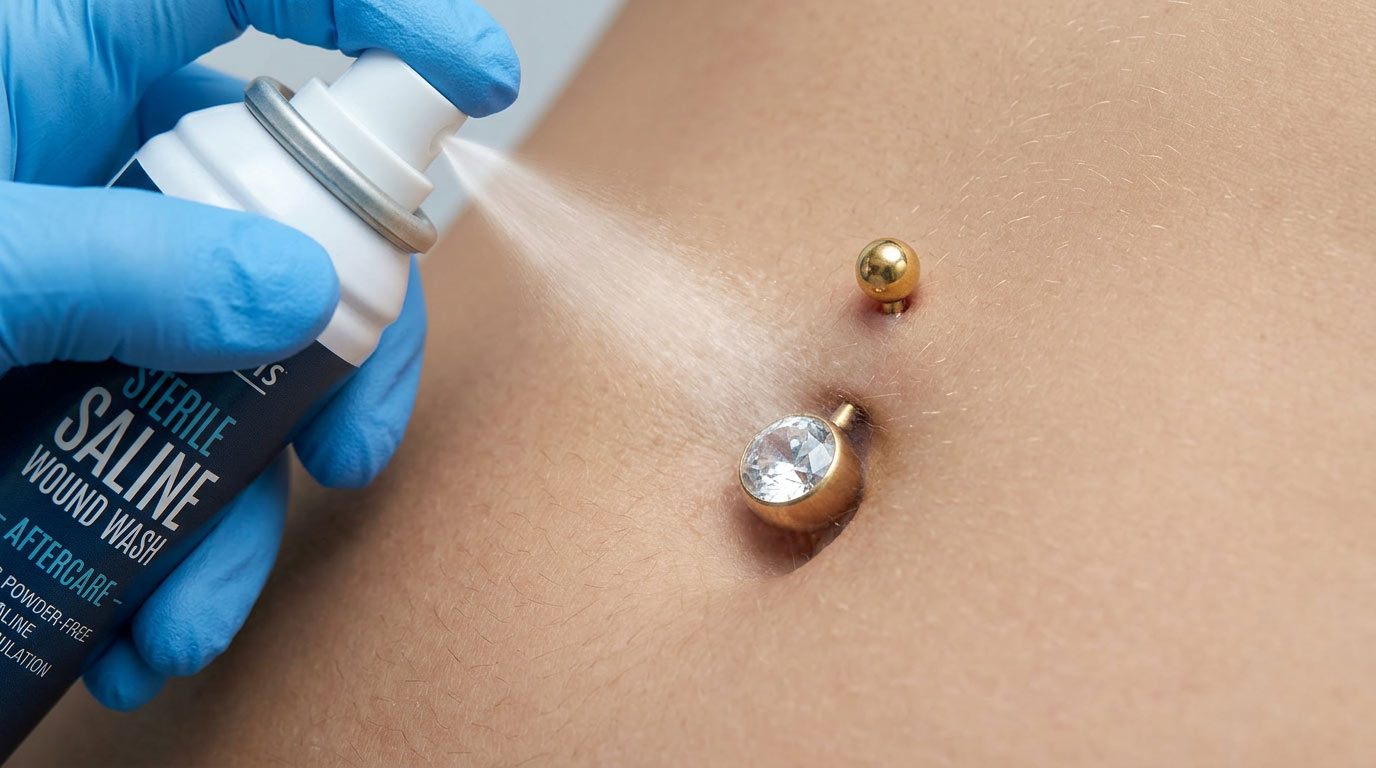
Belly Button Piercing Aftercare
Navel aftercare is simpler than people think but requires consistency over the full 12-month healing period — not just the first few weeks. The navel faces unique challenges that other piercings do not:
1 — Wash Hands First
Every single time before touching. The navel area is particularly vulnerable to bacteria from hands, clothing, and sweat.
2 — Sterile Saline Twice Daily
Spray 0.9% NaCl sterile wound wash (such as NeilMed Wound Wash) on the front and back of the piercing. Let sit 30–60 seconds. See our Saline Solution Guide for the best brands. Do not rotate the jewelry.
3 — Shower Rinse
Let warm water run over the navel in the shower daily. This loosens crusties gently without aggressive touching. Pat dry with a disposable paper towel — never a cloth towel which harbours bacteria.
4 — Protect from Clothing
High-waist and tight waistband clothing rubbing the fresh piercing is the #1 navel healing problem. Wear low-rise bottoms, loose shirts, or cover the piercing with a breathable waterproof bandage during waistband contact.
NAVEL DO
- Wear loose, high-cut or low-rise clothing during healing
- Use a breathable bandage over the piercing during exercise
- Change bedsheets weekly throughout the healing period
- Clean after swimming, sweating, or sun exposure
- Sleep on your back to avoid waistband pressure
- See a piercer if the jewelry appears to be moving toward the surface
NAVEL DON'T
- Never wear tight waistbands directly on the healing piercing
- Don't swim in pools, hot tubs, or the sea during healing
- Don't apply sunscreen, body lotion, or spray tan to the area
- Don't change jewelry before 6–9 months minimum
- Don't use alcohol, hydrogen peroxide, or tea tree oil
- Don't touch or rotate the jewelry during healing
Full aftercare guide: Complete Piercing Aftercare Guide · Saline Solution Guide
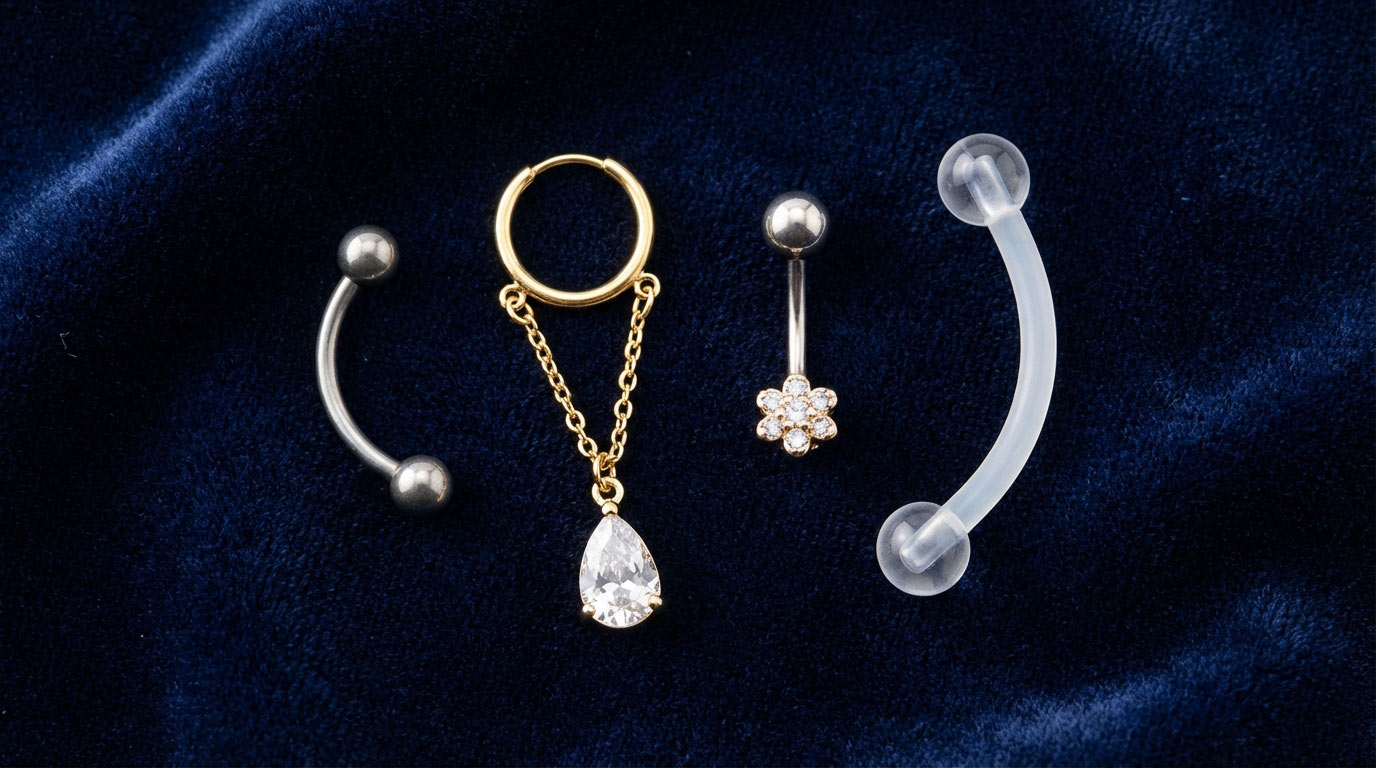
Best Jewelry for a Belly Button Piercing
Navel jewelry has its own specific anatomy requirements. Using the wrong style or material during healing is the most common cause of rejection and irritation:
Curved Barbell (Banana Bell)
The only appropriate initial navel jewelry. Curved to follow the natural anatomy of the navel rim. Standard: 14g, 10mm post, 3mm top ball, 5mm bottom ball. Implant-grade titanium. The curve allows the jewelry to sit without pressure on the healing fistula.
Dangle Belly Ring
Decorative charm or drop hanging from the bottom ball of a curved barbell. The most popular healed navel style — available in endless designs from simple chains to elaborate gem drops. Only safe once fully healed at 9–12 months. The dangle catches on clothing during healing.
Captive Bead Ring (CBR)
A hoop through the upper rim of the navel. Less common but effective for healed navel piercings. Requires a ring sized to fit the full depth of your navel fold. Not suitable for healing — movement disrupts the fistula.
PTFE Flexible Belly Ring
A flexible bioplastic barbell that bends with the belly as it grows during pregnancy. Essential for pregnant people with healed navel piercings — rigid jewelry causes pressure and can cause rejection as the belly expands. Switch at the start of the second trimester.
Reverse Belly Ring
A curved barbell where the larger decorative gem is worn at the top (above the navel) rather than below. The "reverse" or "top-down" style — the dangle falls inside the navel. Very popular in 2025 for its unique appearance when wearing high-cut or crop tops.
Material Guide
Implant-grade titanium (ASTM F136) — best. Nickel-free, lightest. Solid 14k/18k gold (nickel-free) — premium healed option. Implant-grade steel (ASTM F138) — good. Avoid: plated jewelry, acrylic, unknown steel, or sterling silver during healing.
Jewelry Sizing Reference
| Measurement | Standard | For Swelling | Healed |
|---|---|---|---|
| Gauge | 14g (1.6mm) | 14g | 14g (sometimes 16g) |
| Post Length | 3/8” (10mm) | 7/16” (11mm) | 3/8” or 1/4” (6mm) |
| Top Ball | 3mm | 3mm | 3mm–5mm+ |
| Bottom Ball | 5mm | 5mm | 5mm–12mm+ (dangle) |
| Material (initial) | Implant titanium | Implant titanium | Titanium, 14k gold, steel |
Clothing & Lifestyle Tips During Healing
Clothing is the navel's biggest enemy during healing. Here is exactly how to manage it:
Best Clothing Choices
Low-rise jeans and shorts that sit well below the navel. Loose-fitting dresses and skirts. High-cut tops that expose the navel rather than covering it. Floaty fabrics that do not cling.
Clothing to Avoid
High-waisted jeans, leggings, and skirts that sit directly on the piercing. Tight synthetic workout wear. Waistband sports leggings during exercise. Heavy belt buckles. Tucked-in shirts that rub the area.
Exercise & Sport
Cover with a breathable waterproof bandage (Tegaderm) during workouts. Avoid contact sports during the first 3–4 months. Clean the piercing immediately after exercise. Avoid hot yoga and intense core work during early healing.
Beach & Swimming
No swimming in pools, the sea, or hot tubs during healing — all harbour bacteria. No submerging the navel in a bath. Saltwater and chlorine both irritate healing piercings. If unavoidable, cover with a waterproof bandage and clean immediately after.
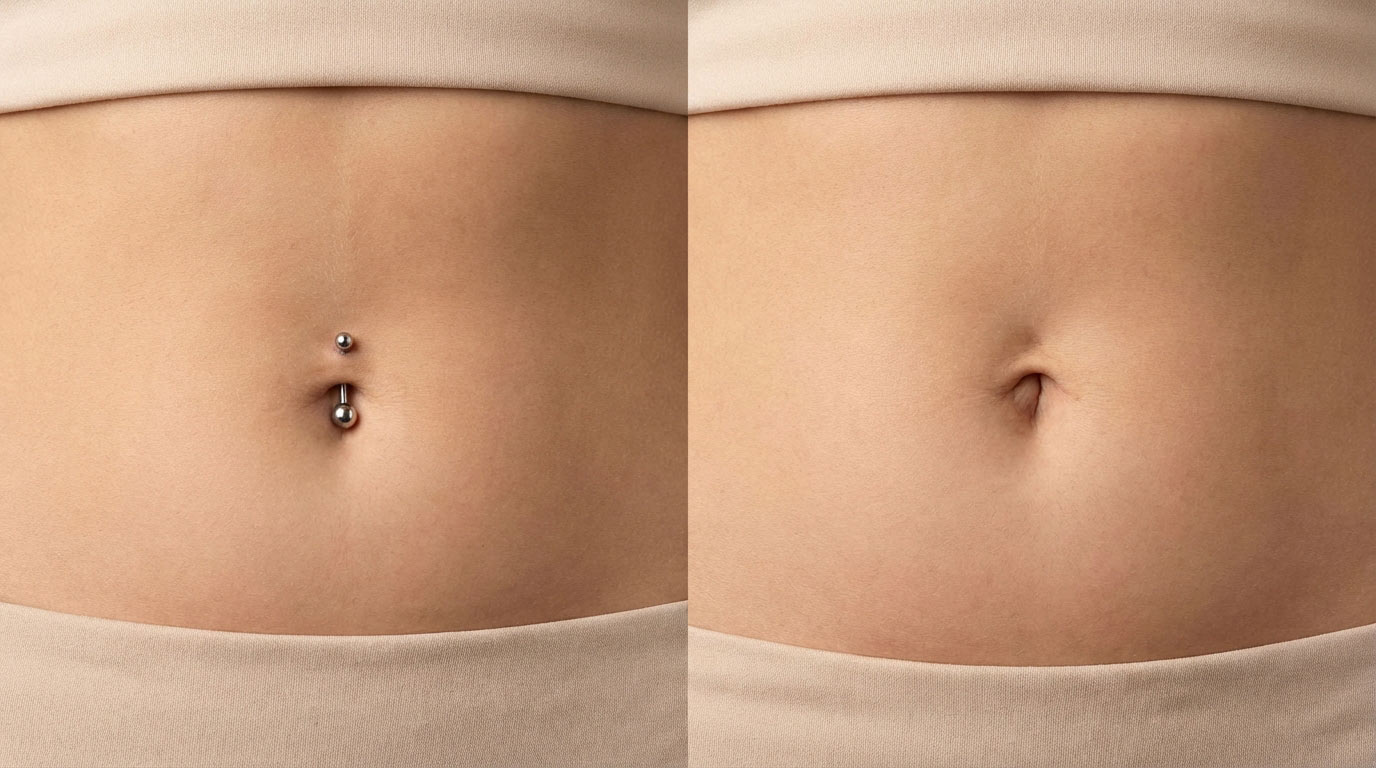
Belly Button Piercing Rejection — Signs & Prevention
Navel piercing rejection is more common than with other piercings because it is a surface piercing. The body recognises the jewelry as a foreign object and attempts to push it toward the skin surface. Know the warning signs:
Normal Healing
Mild redness and tenderness for 1–3 weeks. White or clear crusties around the jewelry. Slight swelling immediately after. Occasional itching as tissue heals. All of these are expected and not signs of rejection.
Early Rejection Signs
Jewelry appears closer to the skin surface than before. The skin between entry and exit holes becomes thinner or more translucent. Piercing tilts or shifts position. Persistent redness and soreness that is not improving.
Advanced Rejection
Jewelry nearly through the skin. Skin between entry and exit very thin. Piercing moved significantly from original placement. At this stage: see your piercer immediately. Early removal leaves a smaller scar than allowing full rejection.
Rejection Prevention
| Risk Factor | Prevention |
|---|---|
| Wrong jewelry material | Implant-grade titanium ONLY during healing — never mystery metals |
| Clothing pressure | Low-rise clothing, loose fabrics, waterproof bandage during exercise |
| Jewelry changed too early | Wait for piercer confirmation at 6–9 months minimum |
| Snagging on clothing | Cover dangle rings — only wear flat curved barbells during healing |
| Swimming/soaking | No pools, sea, or baths during the full healing period |
| Wrong anatomy for placement | Professional assessment before piercing — never rush anatomy decisions |
Infected Belly Button Piercing — Signs & Action
| Issue | Appearance | Action |
|---|---|---|
| Normal healing | Clear/white crusties, mild redness, occasional itching | Continue aftercare — expected |
| Irritation bump | Small soft bump at piercing site — stable, not spreading | Remove irritant — clothing, jewelry material, snagging |
| Minor infection | Increased redness, warmth, yellow discharge | Improve aftercare. See doctor if not improving in 3–5 days |
| Moderate infection | Pus, increasing pain and swelling, not improving | See a doctor — likely needs antibiotics |
| Serious infection | Spreading redness beyond the piercing, fever, red streaks | Urgent care or ER immediately — do not remove jewelry |
Do not remove jewelry during an infection. Removing the jewelry causes the outer holes to close, trapping bacteria inside the fistula channel. This can turn a minor infection into a serious abscess. If you suspect infection, see a doctor while keeping the jewelry in. The doctor can advise on removal if necessary.
Full infection guide: Infected vs Irritated Piercing Guide
Belly Button Piercing & Pregnancy
One of the most searched navel piercing questions — here is the complete answer:
Already Healed Piercing
If your navel piercing is fully healed, it is generally safe to keep during pregnancy. Switch to a PTFE flexible belly ring as early as the second trimester — before the belly grows significantly. PTFE bends with the skin as it stretches and does not create pressure points. Remove completely if it becomes uncomfortable or your OB/GYN advises removal.
New Piercing During Pregnancy
Not recommended. The navel area changes significantly during pregnancy, healing is compromised by hormonal changes, keeping the area clean becomes increasingly difficult, and the growing belly places constant pressure on a healing piercing. Wait until after delivery and the body has returned to its normal state — typically 3–6 months post-partum.
After Removing During Pregnancy
Many people remove their navel piercing during pregnancy. Note that even a fully healed piercing may close during the 9 months without jewelry. After delivery, once the belly skin has returned to normal, a piercer can assess whether the hole is still open or whether re-piercing is needed. Scar tissue from the original piercing may affect new placement options.
Always discuss body piercing decisions during pregnancy with your OB/GYN or midwife. While a healed piercing with PTFE jewelry is generally low-risk, your healthcare provider knows your individual situation best.
Belly Button Piercing Cost 2025
| Venue | Price Range | Includes | Notes |
|---|---|---|---|
| Mall Kiosk / Chain | $15–$35 | Basic jewelry | Often gun piercers — avoid for navel |
| Professional Studio — Titanium | $40–$80 | Needle + titanium curved barbell | Recommended standard |
| Professional Studio — Gold | $80–$150 | Needle + 14k gold barbell | Premium option |
| High-End / Specialist | $100–$200 | Anatomy assessment + premium jewelry | Best for tricky anatomy |
| First Jewelry Change | $20–$50 | Dangle ring or new style fitted | Recommended in-studio at 9 months |
| PTFE Pregnancy Ring | $10–$25 | Flexible bioplastic barbell | Switch during second trimester |
Navel Piercing Styles & Trends 2025
The belly button piercing is having a major fashion revival in 2025, driven by the return of low-rise and crop top trends. Here is what is leading the aesthetic:

CZ Dangle Drops
Large cubic zirconia pendant drops in clear, AB, or coloured stones. The most popular healed navel style of 2025 — pairs beautifully with crop tops and beach wear.
Gold Dangle Sets
Solid 14k gold banana barbells with matching dangle charms — stars, moons, sunbursts. Premium everyday navel jewelry for healed piercings.
Reverse Navel Rings
The decorative gem sits above the navel — trending strongly with high-cut bikinis and crop tops where the above-navel area is visible.
Opal & Pastel CZ
Opal and soft pastel CZ belly rings — the softer, more feminine alternative to clear stones. Huge in 2025's “quiet luxury” jewellery trend.
Minimalist Barbell
A plain polished titanium or gold curved barbell with small matching balls — the understated everyday navel look for those who prefer minimal jewellery.
Chain Dangles
Delicate chain drops hanging from the navel ring — from simple single chains to layered chain tassels. The festival and beach jewellery trend of 2025.
Frequently Asked Questions
How long does a belly button piercing take to heal?
A belly button piercing takes 6–12 months for surface healing and up to 18 months for full internal healing. It is one of the longest-healing piercings because the navel is in a high-movement area subjected to constant clothing friction, bending, and sweat. Do not change jewelry based on surface appearance — have your piercer confirm full healing first.
How do I clean a belly button piercing?
Clean with sterile saline wound wash (0.9% NaCl) twice daily. Spray front and back of the piercing, let sit 30–60 seconds, then pat dry with a disposable paper towel. Let warm shower water rinse the area daily. Never rotate the jewelry, use alcohol, hydrogen peroxide, or tea tree oil. Consistency for the full 12-month healing period is essential — not just the first few weeks.
Does a belly button piercing hurt?
A belly button piercing rates 4–5/10 for pain. It is a sharp pinch through the upper navel rim skin lasting under 1 second. Most people find it less painful than expected. The barbell insertion after the needle is often the more uncomfortable moment. Mild throbbing follows for a few hours, then soreness when touched for 1–2 weeks.
Can I get a belly button piercing with an outie?
A true deep outie cannot be pierced in the standard way — there is insufficient flat skin for a stable surface piercing. Some outie anatomies can accommodate a floating navel or lower-rim placement. Always have your navel assessed in person by an experienced piercer before booking. Attempting to pierce unsuitable anatomy causes rejection and scarring.
What causes belly button piercing rejection?
Rejection occurs when the body pushes the jewelry toward the skin surface. Main causes: wrong jewelry material (plated or unknown metals), clothing pressure from waistbands, changing jewelry too early, snagging on fabric, anatomy not suited to standard placement, and poor aftercare. Warning signs: jewelry visibly closer to the surface, skin between holes becoming thinner, piercing shifting position. See your piercer immediately at early signs.
Can I keep my belly button piercing during pregnancy?
If fully healed, yes — but switch to a PTFE flexible belly ring as the belly grows (typically second trimester). PTFE bends with the skin without creating pressure points. Remove completely if uncomfortable or if your OB/GYN advises. Do not get a new piercing during pregnancy — wait until 3–6 months post-delivery.
What is the best jewelry for a new belly button piercing?
A curved barbell (banana bell) in implant-grade titanium at 14g is the only appropriate initial navel jewelry. Standard sizing: 10mm post, 3mm top ball, 5mm bottom ball. Never use dangle rings, captive rings, or hoops during healing — they catch on clothing and cause rejection. Only switch to dangle styles once full healing is confirmed by your piercer at 9–12 months.
How much does a belly button piercing cost?
A professional studio belly button piercing costs $40–$80 including implant-grade titanium starter jewelry. High-end studios with 14k gold jewelry charge $80–$150. Always choose a professional APP-member needle-only studio — never a mall kiosk gun piercer for a navel piercing. The cost difference is negligible compared to treating complications from an incorrectly placed or poorly healed piercing.
Questions about your belly button piercing?
Drop them in the comments — we answer every one!