
Piercing Aftercare · Complete Guide
Piercing Aftercare:
The Complete Healing Guide
Everything you need to heal your new piercing safely, quickly, and without complications — from cleaning steps to full healing timelines.
Getting a new piercing is exciting — but the real journey starts the moment you walk out of the studio. The difference between a beautiful, healed piercing and a nightmare of infections and rejection almost always comes down to one thing: aftercare.
Why Piercing Aftercare Matters
Every new piercing is an open wound. Your body immediately begins working to heal around the jewelry — and what you do (or don't do) in the weeks and months after determines everything: healing speed, comfort, appearance, and whether the piercing survives at all.
Poor aftercare is the number one cause of piercing infections, rejection, scarring, and premature closure. The good news? Proper body piercing aftercare is surprisingly simple — you need consistency, clean hands, and the right saline solution. That's essentially it.
This guide follows the guidelines set by the Association of Professional Piercers (APP), cross-referenced with board-certified dermatologists and medical sources including the Cleveland Clinic and NHS.
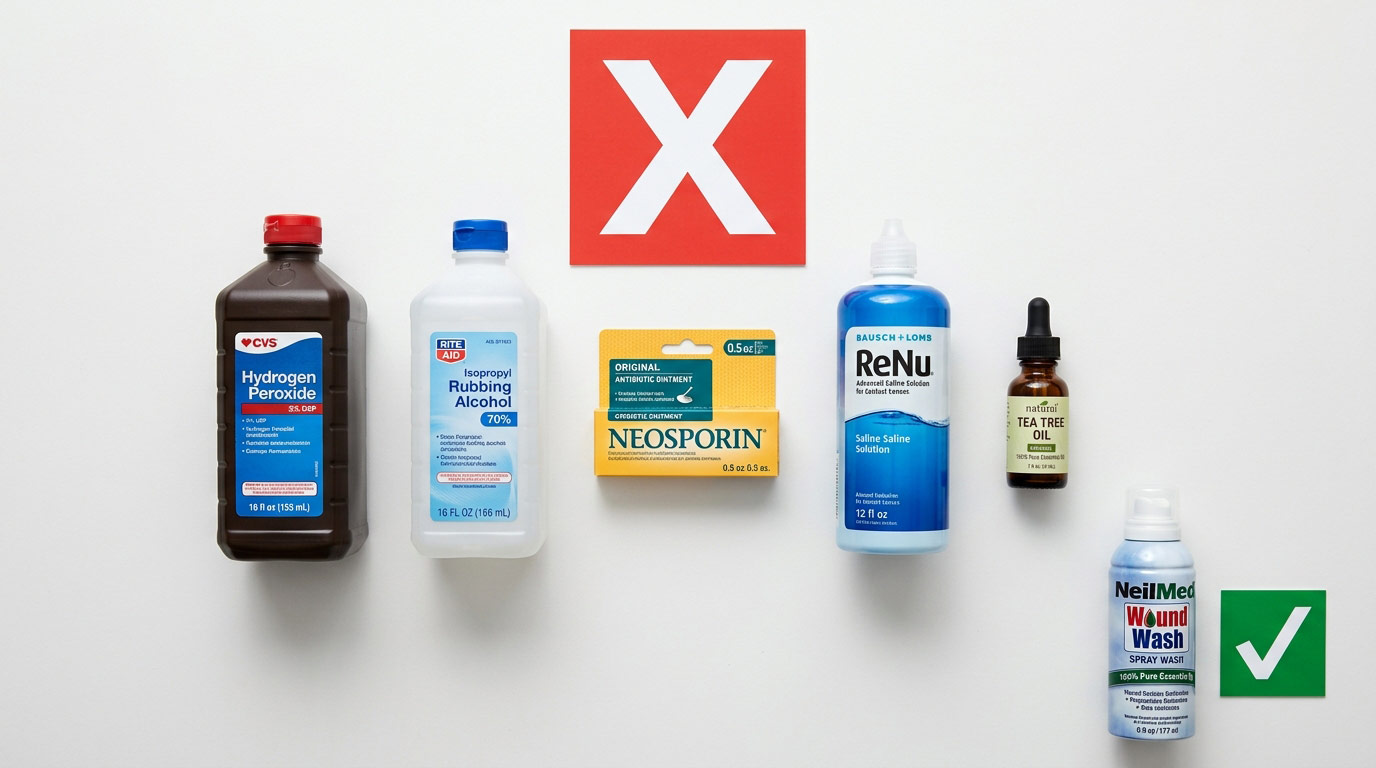
What You'll Need: The Right Products
What to Use
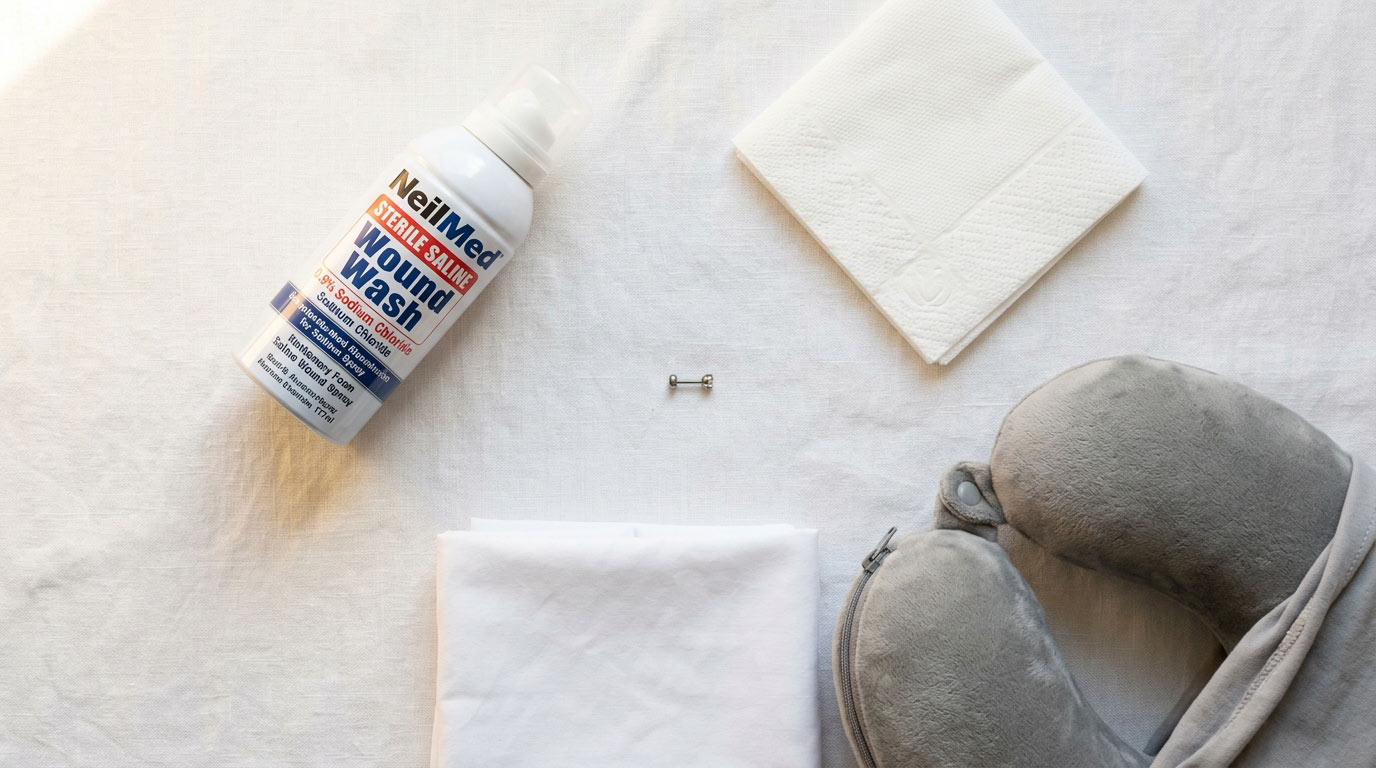
Sterile Saline Wound Wash (0.9% sodium chloride) is the gold standard — look for "wound wash saline" in the first-aid aisle. The only ingredient should be 0.9% sodium chloride: no preservatives, moisturizers, or antibacterials. Trusted options include NeilMed Wound Wash, H2Ocean Aftercare Spray, and Simply Saline Wound Wash. Our complete saline solution guide compares every brand in detail.
What NOT to Use
| Product | Why to Avoid |
|---|---|
| Rubbing alcohol | Too harsh; dries tissue; kills healthy healing cells |
| Hydrogen peroxide | Dissolves new healing skin tissue; significantly slows healing |
| Neosporin / antibiotic ointment | Not for puncture wounds; traps bacteria |
| Betadine / Hibiclens | Damages tissue with long-term use |
| DIY sea salt solution | Almost always too concentrated; over-dries the piercing |
| Contact lens saline | Wrong concentration; contains preservatives not made for wound care |
| Antibacterial soaps | Too stripping; damages healthy healing cells |
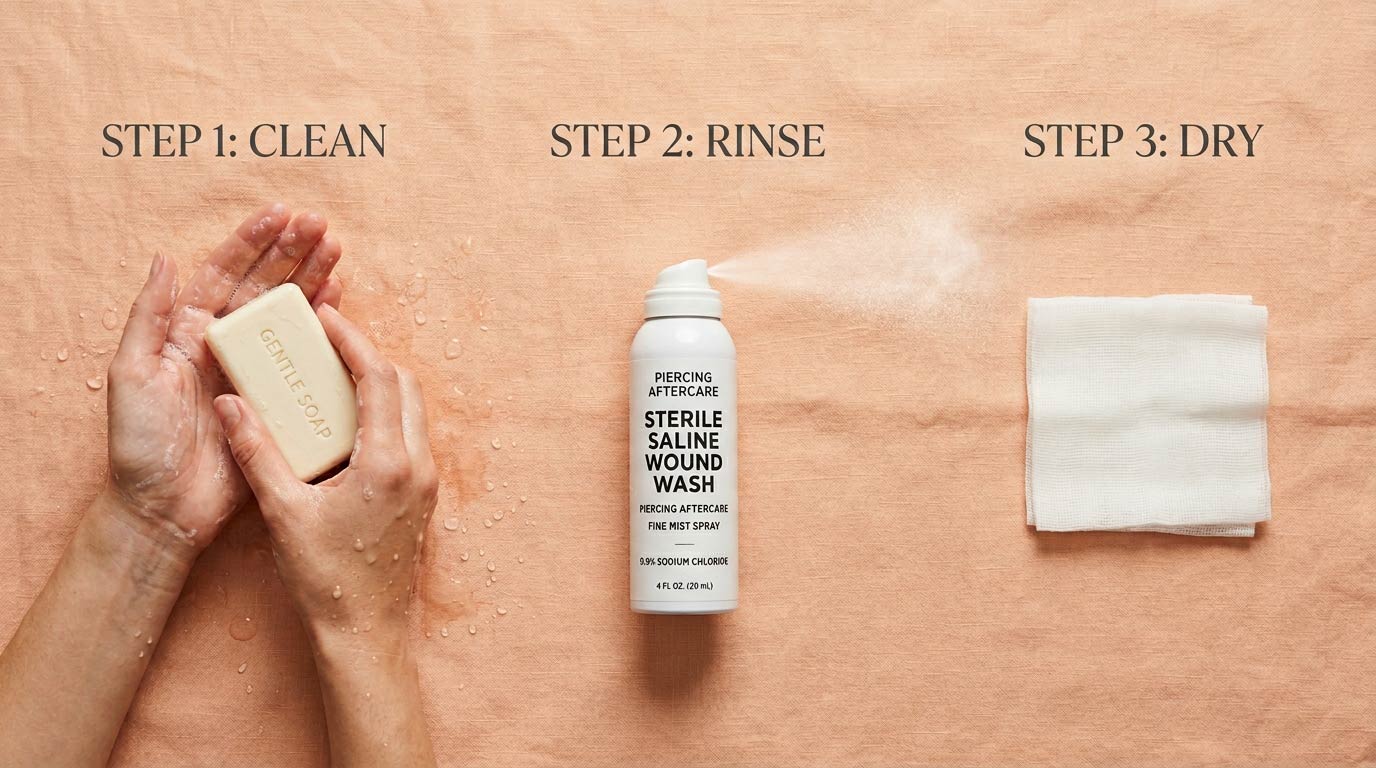
Step-by-Step Cleaning Instructions
Do this twice daily — morning and night — for the entire healing period.
Step 1 — WASH Your Hands
Wash your hands thoroughly with soap and water before touching your piercing — every single time. Your hands carry more bacteria than almost any other surface you touch daily.
Step 2 — SPRAY Front & Back
Spray sterile saline wound wash onto both front and back. Let it sit 30–60 seconds to loosen crusties. Do not rotate or twist your jewelry — this common myth causes micro-tears and introduces bacteria.
Step 3 — DRY Gently
Pat dry with clean, disposable gauze or paper towels. Never use cloth towels — they harbor bacteria and can snag on jewelry, causing irritation.
Frequency: Clean twice daily — morning and night. Over-cleaning (more than 2×/day) irritates tissue and actually slows healing.
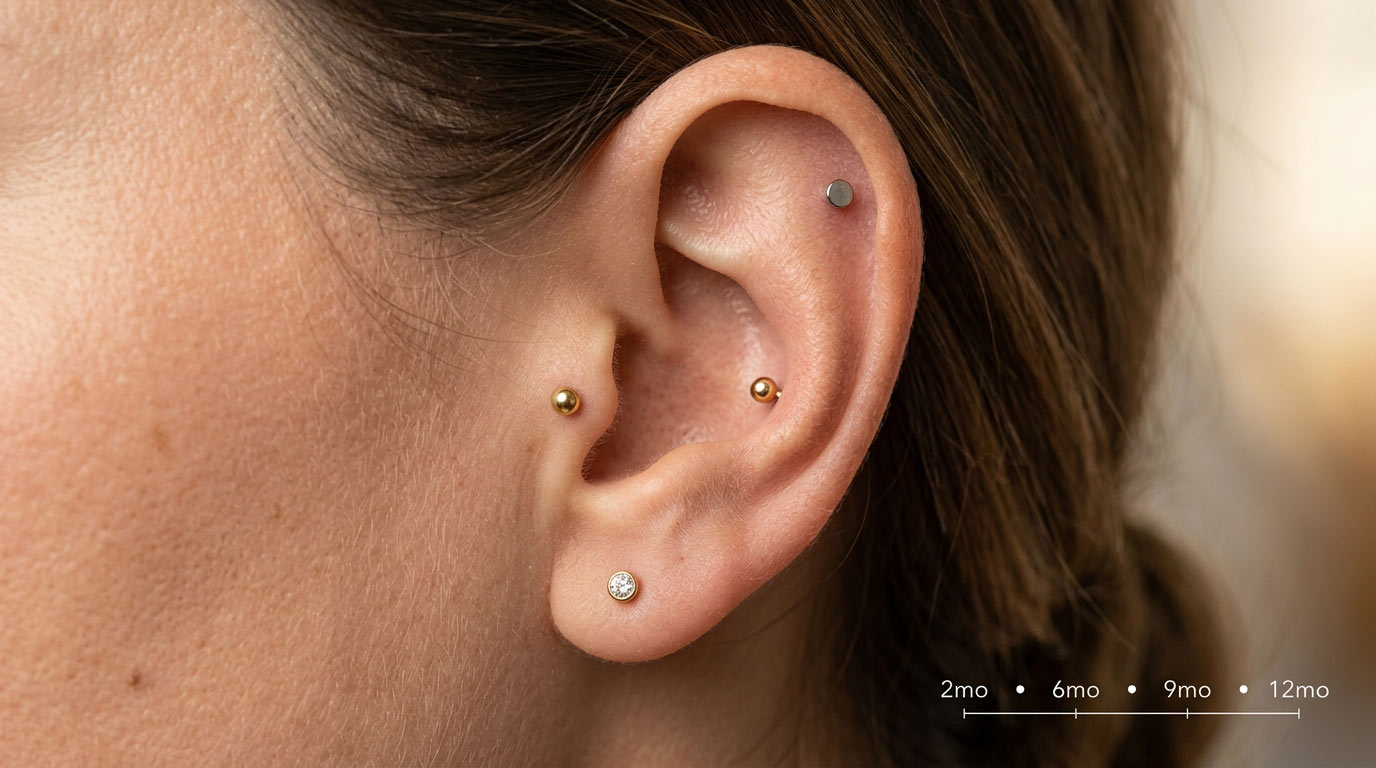
Piercing Healing Times by Type
Your piercing heals from the outside inward. It may look healed on the surface long before the interior is fully healed. Never stop aftercare early or change jewelry without your piercer confirming full healing. For a full breakdown, see our piercing healing times guide.
| Piercing Type | Initial Healing | Full Internal Healing |
|---|---|---|
| Earlobe | 6–8 weeks | 4–6 months |
| Helix (cartilage) | 3–4 months | 6–9+ months |
| Forward Helix | 3–4 months | 6–9+ months |
| Conch | 3–4 months | 6–9+ months |
| Tragus | 3–4 months | 6–9+ months |
| Daith | 3–4 months | 8–12+ months |
| Rook | 3–4 months | 8–12+ months |
| Industrial | 4–5 months | 8–12+ months |
| Nose (nostril) | 2–3 months | 4–6 months |
| Septum | 1–3 months | 6–8 months |
| Navel (belly button) | 3–6 months | 9–12+ months |
| Nipple | 6–9 months | 12–18+ months |
| Dermal | 1–3 months | Up to 9 months |
| Tongue | 4–6 weeks | 3–4 months |
| Lip / Labret | 6–8 weeks | 3–6 months |
General guidelines only. Individual healing varies. Always follow your piercer's specific instructions.
The 3 Stages of Piercing Healing
Understanding what your body is doing during healing helps you make sense of symptoms — and avoid panicking over completely normal things.
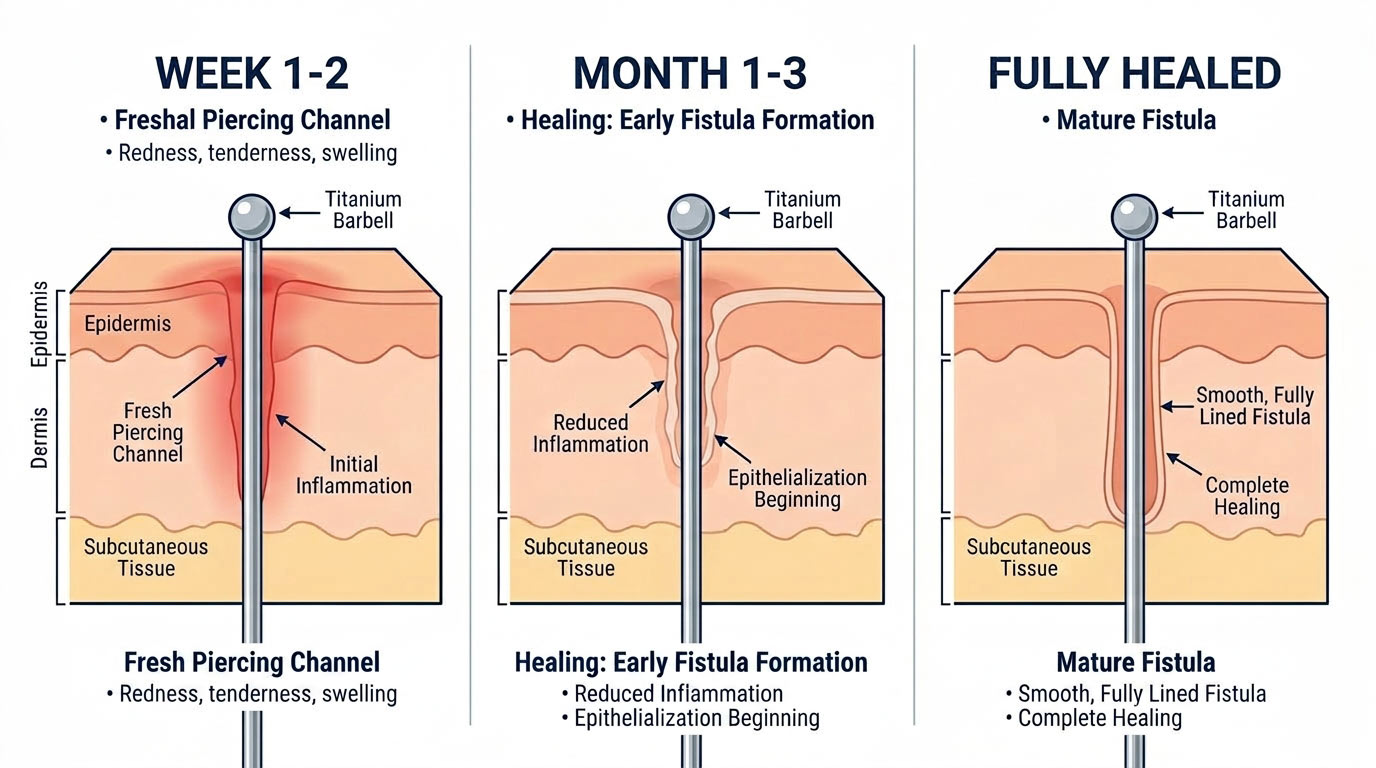
Phase 1 · First few weeks
Inflammation / Acceptance Phase
Your immune system responds: redness, warmth, swelling, some bleeding, tenderness, possible bruising — completely normal. Your body is sending resources to begin healing. Continue cleaning diligently.
Phase 2 · Weeks to months
Healing / Proliferative Phase
Your body builds a fistula — a tunnel of scar tissue. Crusties (dried whitish-yellow lymph fluid) are normal and healthy. Do not change jewelry during this phase, no matter how healed it looks on the outside.
Phase 3 · Final stage
Maturation / Seasoning Phase
Scar tissue strengthens and matures. The piercing becomes fully stable. Only after this phase — confirmed by your piercer — should you consider jewelry changes.
What Is Normal? (And What Isn't)
Normal Symptoms
- Crusties — dried whitish-yellow lymph fluid. Soften with saline, never pick.
- Mild redness & swelling in first 1–2 weeks
- Slight tenderness when cleaning or bumping
- Tissue tightening around jewelry
- Clear or whitish lymph discharge
- Itching — a sign of healing
See a Piercer or Doctor
- Redness/swelling worsening after the first 2 weeks
- Green, yellow, or foul-smelling discharge
- Intense pain that intensifies over time
- Fever or chills following a piercing
- Jewelry sinking / embedding into skin
- Red streaks radiating from the site
Not sure which one you're seeing? Our guide on infected vs irritated piercings walks through every warning sign in detail.
Piercing Aftercare Do's & Don'ts
DO
- Wash hands before every touch of your piercing
- Clean twice daily with sterile saline wound wash
- Pat dry with disposable gauze or paper towels
- Change pillowcases at least 2× per week
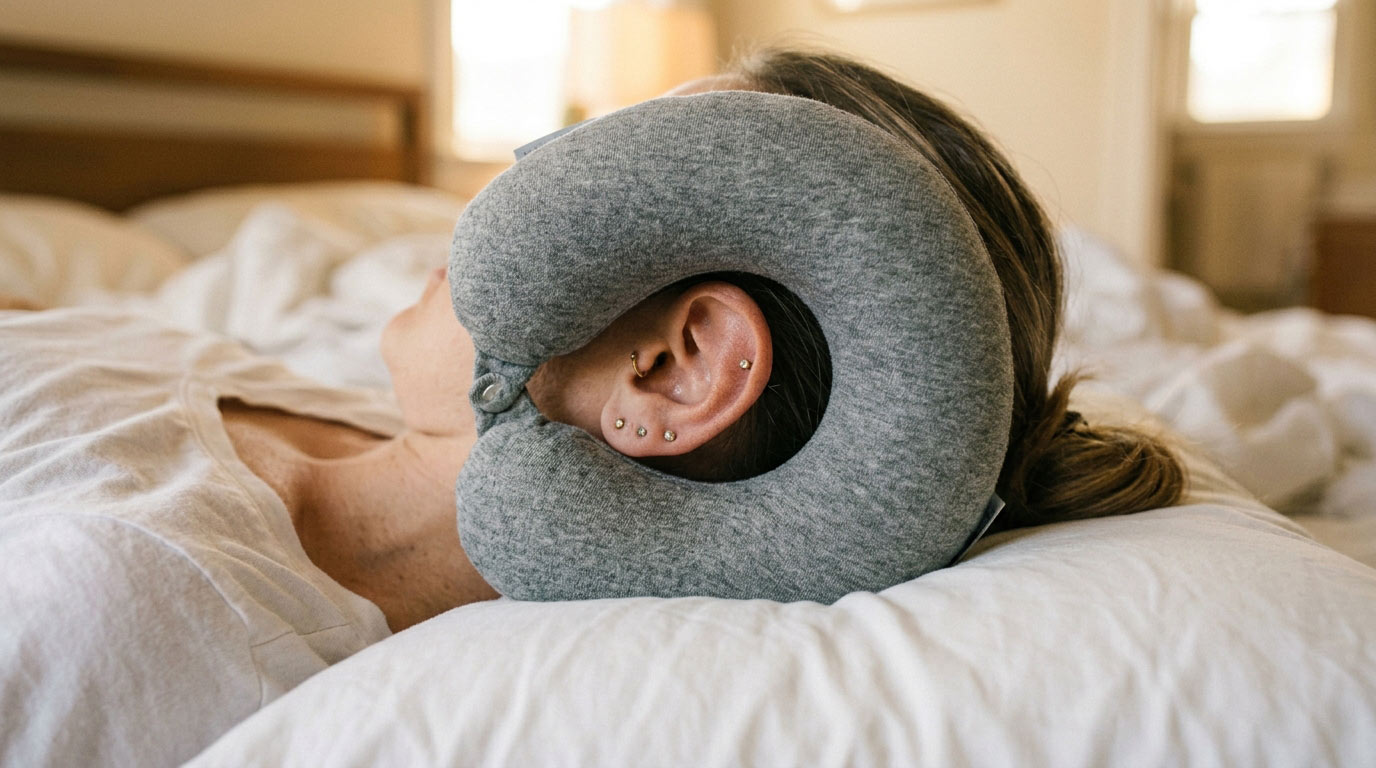
- Use a travel pillow for ear piercings when sleeping
- Book a downsizing appointment 4–6 weeks after piercing
- Get enough sleep & eat nutritiously
DON'T
- Rotate or twist jewelry — ever
- Touch with unwashed hands
- Use alcohol, hydrogen peroxide, or Neosporin
- Swim in pools, oceans, hot tubs, or baths
- Change jewelry early — even if it looks healed
- Sleep directly on new ear or facial piercings
- Over-clean — more than twice daily irritates tissue
- Use DIY sea salt solutions
How to Recognize a Piercing Infection
Not every discomfort is an infection — but infections do happen and require prompt attention. Learn the full picture in our infected vs irritated guide.
Warning Signs
- Progressive worsening redness, swelling, and warmth after the first 2 weeks
- Thick green, yellow, or foul-smelling discharge
- Significant pain or throbbing that intensifies over time
- Fever or chills
- Red streaks radiating from the piercing site
Do not remove the jewelry if you suspect infection — this can trap it inside the tissue. See a doctor promptly, and consult your piercer as well.
Piercing Bumps vs. Keloids
A bump isn't automatically a keloid — most are harmless irritation bumps. Our piercing bump vs keloid guide has a full self-diagnosis checklist.
Common
Irritation Bump
Small bumps at the edge of the piercing hole. Extremely common. Caused by trauma, jewelry that's too long, sleeping on the piercing, or harsh products.
Treatment: Remove the irritation source. Return to your piercer to check jewelry fit. Continue saline aftercare. They typically resolve on their own.
Rare
True Keloid
Raised scar tissue that grows beyond the original wound borders. More common in darker skin tones, with a genetic component. Does not resolve on its own.
Treatment: Requires medical treatment — steroid injections, laser, or surgical removal. See a dermatologist.
Aftercare Tips by Piercing Type
Ear Piercings (Lobe & Cartilage)
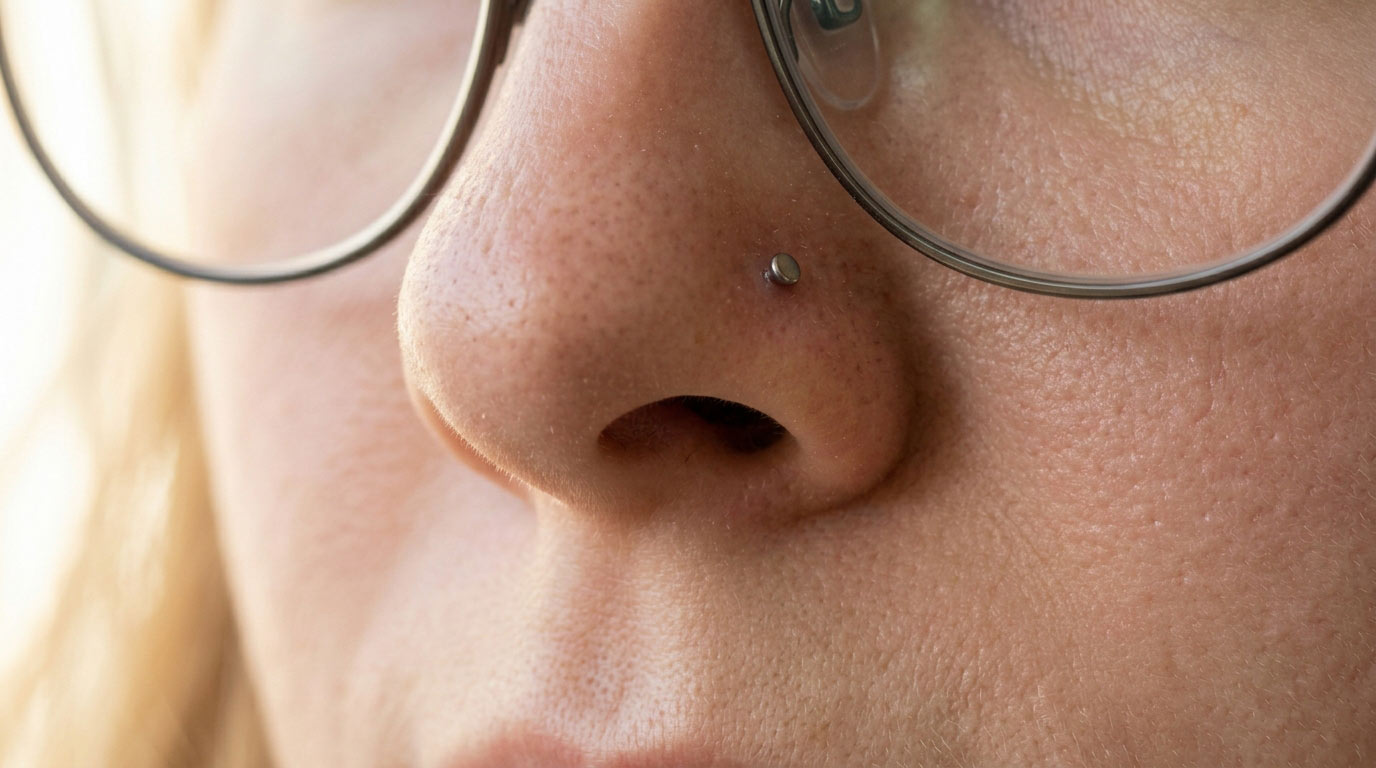
Nose Piercings (Nostril & Septum)
Belly Button (Navel) Piercings
Nipple Piercings
Oral Piercings (Tongue, Lip, Labret)
Dermal Piercings
Frequently Asked Questions
Should I rotate or twist my jewelry while cleaning?
No. This is one of the most persistent piercing myths. Rotating jewelry damages healing tissue and introduces bacteria. The Association of Professional Piercers confirms it — leave jewelry completely alone during cleaning.
Can I go swimming with a new piercing?
Not until fully healed. Pools, hot tubs, oceans, lakes, and baths all harbor bacteria that can infect a healing piercing. Showering is fine. If you must swim, use a waterproof wound-sealant bandage like Tegaderm to protect the site.
What does normal discharge look like?
Normal discharge is clear to whitish-yellow, odorless or very mildly odored, and dries into crusty buildup around jewelry. This is lymph fluid — completely normal. Green, thick, foul-smelling discharge that worsens over time may indicate infection.
When can I change my jewelry?
Only after fully healed internally — not just when it looks or feels healed on the surface. Always ask your piercer to confirm full healing before attempting a jewelry change. Changing too early is one of the most common reasons piercings fail.
What is the best jewelry material for healing?
Professional piercers recommend implant-grade titanium (ASTM F136), 14k or 18k solid gold, or implant-grade surgical steel (ASTM F138). Avoid mystery metals, acrylic, or plated jewelry. See our best jewelry for new piercings guide for the full breakdown.
My piercing is itching — is that bad?
Itching is generally a sign of healing, not infection. Resist the urge to scratch. Continue your cleaning routine and leave the jewelry alone.
Final Tips
Heal Your Piercing Like a Pro
Patience first. Healing cannot be rushed. Trying to speed it up almost always sets you back.
Lifestyle matters. Poor sleep, stress, alcohol, and smoking all slow healing significantly.
Trust your piercer. They're your best resource — far better than internet forums or friends.
safepiercing.org & aad.org — gold-standard authoritative sources.
Have questions about your specific piercing?
Drop them in the comments below — we'd love to help!
pierceing.com
Sources: safepiercing.org (APP) · aad.org
Informational purposes only. For medical concerns, consult a qualified healthcare professional or professional piercer.